Video recording is one of the well-liked hobbies humans and has developed post-smartphone revolution. However, only pro-users have in use this hobby seriously and achieved some skills. Other part-time are just shooting videos of their families, especially of kids, with some faults.
I have a notice that most time and again people capture videos in vertical mode; or even if they capture or shoot videos in horizontal mode, the results are radically faulty, showing video neither in vertices nor the horizontal mode. Finally, all the fun and enjoyment is killed. People also like to rotation black lines on the sides of their videos when watched horizontally that very clear or watchful. Thankfully, there is a solution to this problem. Now users can rotate videos in their iPhone and iPad devices.
iMovie is a one of the popular application that built-in feature for iOS users, who have a need to convert their vertically aligned videos or movies into horizontal mode. Now, you don’t need to see movies or videos in vertical mode even though you have captured them in horizontal mode. Let’s check out how?
iMovie is a free app available on iPhone and iPad; you can download it from App Store.
How to Rotate Video on iPhone/iPad by using iMovie
iMovie is one the powerful application which is rotated any movie or video on iPhone/iPad at 90 degrees, 180 degrees, 270 degrees. If you are happy with the default view, you can rotate the video 360 degrees.
Step to follow:
Step 1: Launch iMovie app on your iOS device.
Step 2: Tap on the Video button to select a movie or video from the list.
Step 3: Now tap on the Share button from the bottom menu.
Step 4: Tap on Create Movie option.
Step 5: Rotate the video with your two fingers in any direction you want (you can keep the distance of an inch between your two fingers).
Step 6: When you achieve the right orientation, tap on the done button from the upper left corner of your iOS device screen.
Step 7: Tap on Sharing button again from the bottom menu.
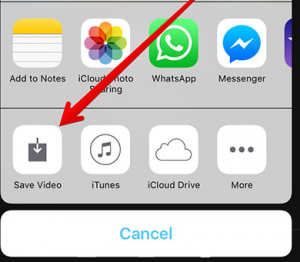
Step 8: You don’t need to share the video, rather save it by tapping on Save Video button.
Step 9: Now select the export size from four options: Medium, Large, HD (720p), and HD (1080p).
After a process complete, iMovie informs you that the video is exported to your Photos Library. So, to watch this newly saved video, don’t open Videos app on your iPhone or iPad; instead, go to your Photos app and there you will find this newly created video.


 Online casino
