


Nowadays, Apple has released the new iOS 11 with new advanced features. The most stunning features like Taking a screenshot, new Control Center set-up, Screen recording feature no any third party apps or software required, and much more to change. So here I will show you how to record your iPhone screen with iOS 11 runs on your iPhone, iPad.
Let’s start the screen recording on your iPhone; so first you need to add this features functionality to Control Center. However, just you need to enable/ disable Airplane Mode. And after recording full-screen video it can be automatically saved in Photos app. You can use filters and editing tools that available on the recording screen cool clips and blast them on social media to win rave reviews from your friends. So let’s try to record your iPhone and iPad screen in iOS 11!
Contents
How to Record iPhone or iPad screen in iOS 11
Quick Links:
- How to Enable Screen Recording in iOS 11
- How to Start Screen Recording in iOS 11
- How to Record iPhone Screen with Sound in iOS 11
- How to Stop Screen Recording in iOS 11
- How to Edit the Screen Recording Videos in iOS 11
How to Enable Screen recording in iOS 11 on iPhone/iPad
Step 1: Open Setting App on Your iOS device.
Step 2: Next, Scroll Down and Tap on Control Center > Go to Customize Controls and scroll down to Screen Recording.
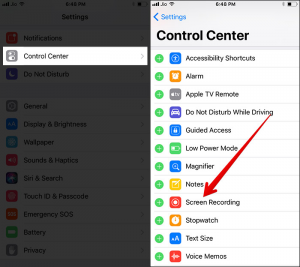
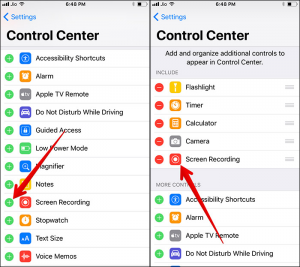
Step 3: Now Tap on Green ‘+’ Button to the screen left side of screen recording option to add it in control center and Now “Screen Recording” should be under the INCLUDE.
How to start capturing iPhone/iPad Screen with Screen recording in iOS 11
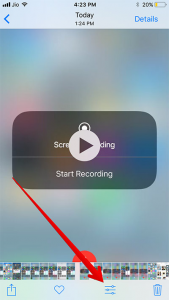
Step 1: Now Just Swipe up from the bottom of the screen to access Control Center on your iOS device.
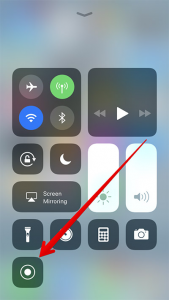
Step 2: Tap on “Recording” icon to capture your device screen.
How to Record iPhone Screen with Sound in iOS 11
Step 1: Now, record the screen with sound, Just touch and hold on the recording button (Apply 3D Touch).
Step 2: After Tap on the microphone icon in the shortcut menu (Button with turned RED).
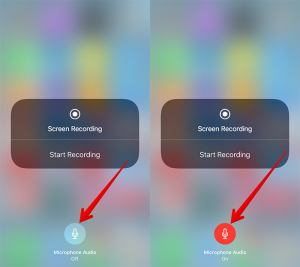
Step 3: And Tap on Start recording button to start things off.
How to Stop iOS 11 Screen Recording on iPhone/iPad
Simply just follow the steps and easy ways to stop screen recording.
Step 1: Once you start the screen recording you can show the screen top of the status bar, just tap on it.

Step 2: Now the screen will notify to stop recording. Tap on Stop.

Different ways, just swipe up from the bottom to bring up Control Center. Next, 3D Touch the recording button. Then, tap on Stop recording button.

After recording stop you can find out all the screen recording videos on photo app on your iPhone, iPad.
How to Edit the Screen Recording Videos in iOS 11
After recording your iPhone screen, now you can edit your recording videos on their tools just follow how’s?
Step 1: Open the Photos app and select the recorded video.
Step 2: After, tap on the edit button at the bottom.
Step 3: just tap and hold on one of the black arrows on either side of the frame viewer. Then, you need to move it inner in order to trim it. The yellow cropping indicator on either side would let you check it out in a better way.

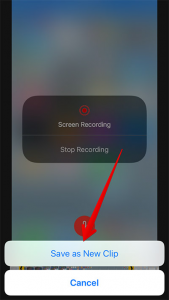
Step 4: After edits, tap on Done in the bottom right corner.
Step 5: Finally, tap on Save as New Clip. The edited video will be saved as a new clip and your original screen recording won’t be overwritten.
Wrapping up,
Now the ability to record screen is a greeting feature in iOS 11. Just like many of you, I really helpful for it. I hope that this guide through no any query, and share your iPhone users to this feature how to works and comment it.


 For Android")


