


Screen recording is a useful feature that allows you to capture everything that happens on your Mac’s screen. Whether you want to create a tutorial, record a video call, or capture a gameplay session, screen recording can help you achieve your goals. In this article, we’ll show you how to screen record on a Mac in 3 ways.
Contents
Can You Screen Record on Mac with Sound?
It’s important to note that the ability to screen record with audio depends on the device and operating system you are using. For example, some older devices may not have the capability to record sound while others may require additional screen recording software to enable this feature. Therefore, it is essential to check your device’s specifications and ensure that it supports audio recording.
If your device supports audio recording, the next step is to enable the sound recording feature. On most devices, this can be done by accessing the screen recording settings and selecting the option to record audio. Some devices may also allow you to choose whether to record audio from the device’s microphone or the system audio.
Once you have enabled the sound recording feature, you can start recording your screen with sound. To do this, simply open the app or content you want to record and start the screen recording process. During the recording, any sound that is played on your device will be captured along with the video.
Screen Record on Mac via Gemoo Recorder
Gemoo Recorder is a screen and audio recording app that offers a variety of features such as screen recording, webcam recording and audio recording. It is a popular choice among businesses and educators. Gemoo Recorder allows you to record your screen, webcam, and audio simultaneously or independently. It also supports you to upload and save your recordings to the cloud space.
Step 1. Free download Gemoo Recorder and open it on your Mac computer.
Step 2. Select the Screen Only mode and click on the Start Recording button when you need to start to record.
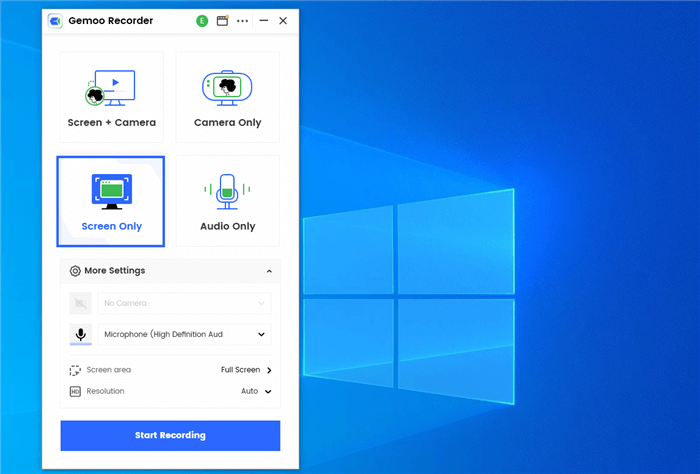
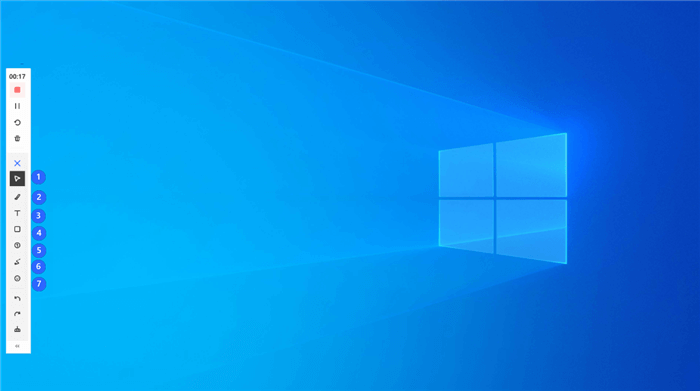
Step 3. Hit the Red Stop icon on the toolbar to finish the recording.
Screen Record on Mac via Screenshot Toolbar
Screen recording on Mac via the Screenshot Toolbar is a simple and convenient way to capture your screen activity. With just a few clicks, you can start recording your screen and create high-quality videos for various purposes.
In this part, we’ll show you how to screen record on Mac via the Screenshot Toolbar.
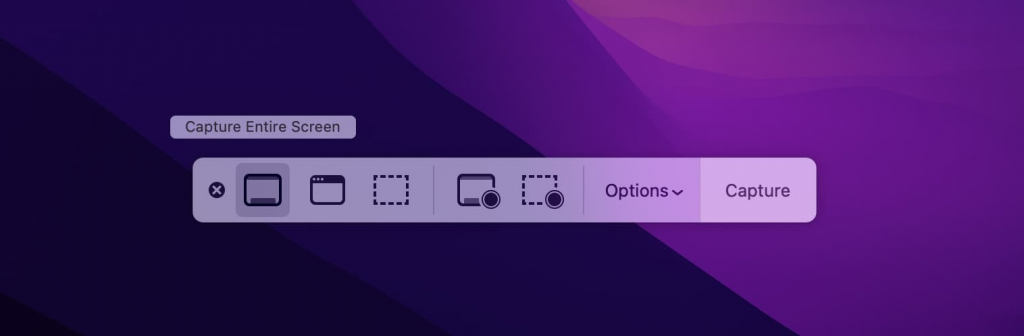
Step 1. Open the Screenshot Toolbar: To access the Screenshot Toolbar, press Shift + Command + 5 on your keyboard. This will open the Screenshot Toolbar at the bottom of your screen.
Step 2. Choose the Screen Recording Option: To start a screen recording, click on the “Record Entire Screen” button. If you want to record a specific portion of your screen, click on the “Record Selected Portion” button and drag your cursor to select the area you want to record.
Step 3. Stop Recording: To stop the recording, click the “Stop” button in the menu bar at the top of your screen. Alternatively, you can press Command + Control + Esc on your keyboard to stop the recording.
After stopping the recording, a thumbnail of the recording will appear in the bottom-right corner of your screen. Click on the thumbnail to open the recording in QuickTime Player. From there, you can edit the recording or save it to your computer.
Screen Record on Mac via QuickTime Player
If you’re a Mac user, you’re probably familiar with QuickTime Player. It’s the default media player that comes with every Mac. However, do you know that QuickTime Player is more than just a simple media player?
Another great feature of QuickTime Player is its screen recording capabilities. With QuickTime Player, you can easily record your screen and create video tutorials, demos, or presentations. You can even record audio from your computer’s microphone or an external microphone. This feature is especially useful for educators, trainers, and anyone who needs to create instructional videos.
Now, let’s take a closer look at how to screen record on Mac via QuickTime Player.

Step 1: Open QuickTime Player: You can do this by clicking on the QuickTime Player icon in your Applications folder or by using Spotlight search.
Step 2: Start a New Screen Recording: Click on the “File” menu and select “New Screen Recording” from the dropdown menu. Alternatively, you can use the keyboard shortcut “Command + Control + N” to start a new screen recording.
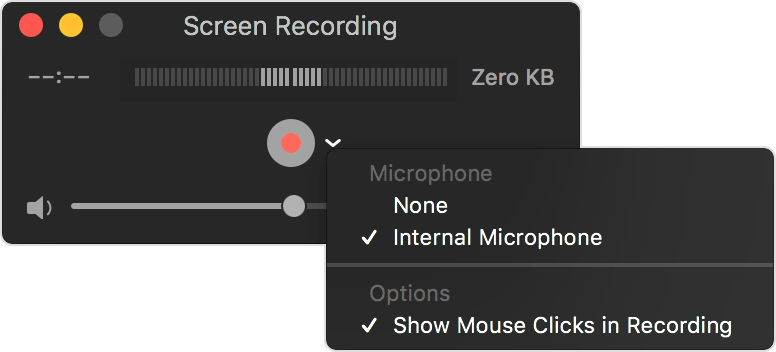
Step 3: Customize Your Recording Settings: Before you start recording, you can customize your recording settings by clicking on the arrow next to the red record button. Here, you can choose to record audio from your Mac or an external microphone, select the quality of your recording, and choose whether to show mouse clicks in your recording.
Step 4: Start Recording: Click on the red record button to start recording your screen. You can choose to record your entire screen or a specific portion of your screen by clicking and dragging the recording window to the desired area.
Step 5: Stop Recording: When you’re finished recording, click on the stop button in the menu bar or press “Command + Control + Esc” on your keyboard. Your screen recording will automatically be saved to your Mac’s desktop.
After you’ve stopped recording, you can edit your screen recording using QuickTime Player’s editing tools. You can trim the beginning or end of your recording, adjust the volume, and add annotations. Once you’re satisfied with your recording, click on “File” and select “Save” to save your screen recording to your desired location.
The Bottom Line
Whether you want to create a tutorial, record a presentation, or capture a gameplay show, screen recording on Mac is a useful feature that can help you achieve your goals. Take the mentioned measures in this article, you will find how easy it is to screen record on Mac.


![How To Textedit Mac Download and Use [Complete Guide]](https://www.mobupdates.com/wp-content/uploads/2023/10/How-To-Textedit-Mac-Download-and-Use-218x150.jpg "How To Textedit Mac Download and Use? [Complete Guide]")


 For Android")


