


Here, I explain to How to take a screenshot on your Mac and you can take screenshots with a few quick keyboard shortcuts and Mac OS X also includes more powerful screenshot tools to take screenshot Mac Easily.
There is much time when you need to take a screenshot on your Mac and have a software bug to report important pop-up, threaded web conversations and screenshot Mac are automated saved in Mac folder that is best. Now see below guide to very easy different type to take Screenshot on your Mac that is best.
Contents
How to take a screenshot on your Mac

How to take a screenshot of a selected portion of your screen
Now screenshot Mac of part of your screen and after press Command+Shift+4 instead and Click and drag to select part of your screen. Release the mouse button and that part of your screen will be saved as a .png file on your desktop not clear, see below steps.

Step 1: Press Shift-Command-4. The pointer changes to a crosshair.
Step 2: Move the crosshair to where you want to start the screenshot.
Step 3: After then drag to select an area.
Step 4: Now you can hold Shift, Option or Space bar to change the way the selection moves.
Step 5: you are selected the area you want, release your mouse or track Pad button.
Step 6: to cancel after press the Esc key before you release the button.
Step 7: Save Png File.
Now done to take Screenshot of a selected portion of your Screen on your Mac very Easy.
How to take a screenshot of a window
Step 1: Press Shift-Command-4.
Step 2: Press the Space bar after pointer changes to a camera.
Step 3: Move the camera over a window to highlight it.
Step 4: Click your mouse or track pad.
Step 5: To cancel after press the Esc key before you click.
Step 6: Find the screenshot as a .png file on your desktop.
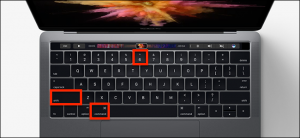
How to take a screenshot of the Touch Bar

Step 1: Screenshot Mac with a Touch Bar and macOS Sierra 10.12.2.
Step 2: Press Shift-Command-6.
Step 3: Find the screenshot as a .png file on your desktop.
Step 4: You can also customize the Control Strip region of your Touch Bar to include a Screenshot button.
Step 5: Then tap the Screenshot button to see options for the type of screenshot.
Step 6: After to save it.
How to Take a Timed Screenshot

Here, you may want to take a screenshot using a timer. You start the timer and which lasts for a few seconds after the timer expires and your Mac will take a screenshot of your entire screen and use the Grab app included with your Mac after you can launch it by pressing Command + Space to open Spotlight search and typing Grab and pressing Enter and find it at Applications > Utilities > Grab that is best all time.
Now Grab not opens a window on your desktop but launch or click it on your dock and you all see a Grab menu at the top of your screen. Click Capture > Timed Screen to take a timed screenshot and after Click Start Timer in the timed screen Grab Window and after start time counts down after stop timer and take screenshot Mac automatically after Save Screenshot in your Mac.
Now completed Guide for How to take a screenshot on your Mac and you read this guide very helpful for you.


 For Android")


This i like. Thanks!
Appreciating the hard work you put into your site and detailed information you provide.
It’s great to come across a blog every once in a while that isn’t the same old
rehashed information. Excellent read! I’ve bookmarked your
site and I’m adding your RSS feeds to my Google account.