


 Sometimes, Android Smartphones have do not connect to wifi networks and at the time we will show a message like ‘Failed to Obtain IP Address’ Failed. And if you have to try to solve this problem but it is not an easy to fix, it cannot solve by downloading certain apps that claim to “fix” this error. I don’t recommend you to download such app as it could sometimes cause more problems than it can solve. You can solve it but just you need to follow these simple steps that can be very easy ways to Fix Obtaining IP Address Error in Android
Whenever you turn on your Wi-Fi networks at a time your device tries to connect the nearest connection. It searching and scanning all the networks and after tries to obtain an IP address from it but it disconnects at a times and again to try to connect. This is what this error is all about. This is owing to the Wi-Fi router that couldn’t assign an IP address for your device. So let’s start to fix this error follow the simple steps:
Fix Obtaining IP Address Error in Android

For Android version 2.x to 4.0
- Go to Settings and select Wireless and Networks. Turn on Wi-Fi and enter Wi-Fi settings.
- Press Menu and select Advanced.
- Check Use Static IP and assign the values according to the screenshot.
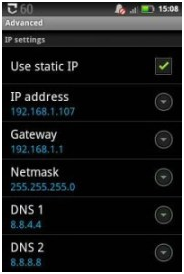
- You can use IP address of your choice.

Add this Statics:-
- IP Address > 192.168.1.1-255 (you can choose any from 1-225)
- Gateway > 192.168.1.1
- D.N.S. 1 > 8.8.8.8
- D.N.S. 2 > 8.8.4.4
For Android version 4.1 and higher
- Go to Settings and tap on Wi-Fi.
- Turn on the Wi-Fi and connect to a network.
- Long press on the connected network and select Modify Network.
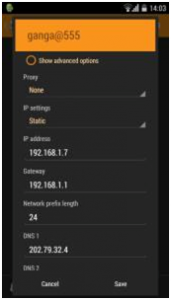
- Check Show Advanced Options.
- On IP Settings drop down menu, select Static.
- Assign IP of your choice but leave another variable untouched.
Now you should successfully to solve the obtaining IP address error. Make sure you select a unique IP address like 192.168.1.1-255 so that it won’t conflict with other connected devices.
Note: For those who are having a problem connecting to the internet after you can choose manually Static IP and easy to connect Wi-Fi networks, follow this. It is suggested by our reader Aiyzik. Tell us if this works for you.
“This solution for who can’t use the internet but gets connected to the wifi here is what you should do.
After changing to IP address static wait till it gets connected then go back to wifi settings while it is still connected and change back to DHCP it would remain connected and you can access the internet.


 For Android")


